TuneLab is software that helps you to tune pianos. This software comes in various forms: for laptops, Pocket
PCs, and Windows Mobile Smart phones. This manual describes TuneLab Pocket, which includes Windows
Mobile Smart phones that have a touchscreen. There are separate manuals to describe TuneLab for the other
platforms (laptops and Smart phones without a touchscreen).
This is a Basic out line of the main functions of TuneLab pocket
for a more in dept view download and read the manual Here
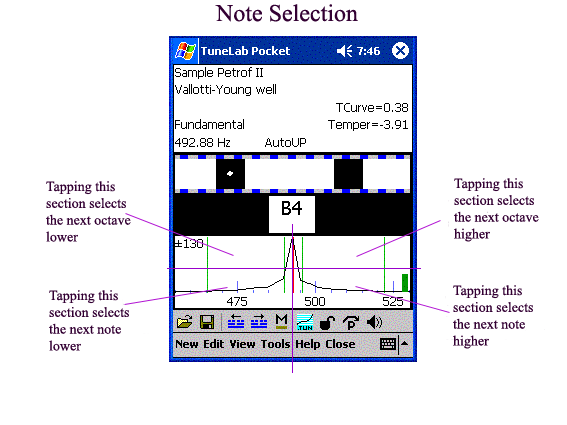
You can directly select any natural note by bringing up the pop up keyboard and tapping on the letter and number for the desired note and octave. The pop up keyboard is controlled by the little keyboard icon in the lower right of the screen. The keyboard will disappear automatically after the octave number is tapped. So you can select any natural note with just three taps - one to bring up the pop up keyboard and two to tap the letter and number for the desired note.
To select a sharp note, start with the natural and then tap on the “Note up” portion of the spectrum display as described below.
Imagine that the spectrum display is divided into four quadrants, as shown in the picture to the right. If you tap in either of the upper two quadrants of the display, the octave number will change down or up.
If you tap in either of the two lower quadrants of the display, the note will change by one half-step up or down. When you tap on any quadrant to change note, that quadrant will briefly turn all grey to indicate that the note is being changed. That portion of the spectrum display will be refreshed on the next display update, which happens about three times per second. But if you have turned on sound-generating mode, then the spectrum display is not being refreshed, so the grey note changing indications will remain grey.
By using combinations of Octave Up, Octave Down, Note Up, and Note Down, you can select any note, without using the pop up keyboard.
The Spectrum Display:
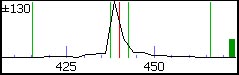
The spectrum display is the graph shown here with the zoom set to +/- 130 cents around the desired pitch. Using the Edit Options menu, you can choose to make the traces thicker for easier visibility, at the cost of a some loss of resolution.
This display shows how the sound energy is distributed across the frequency spectrum. If TuneLab is listening to a pure tone, then the spectrum graph will show a single peak. The example seen to the right was made from an A-440 tuning fork that was actually a little flat. The red line in the center of the display marks the correct pitch. The green lines nearest the center mark the points that are 10 cents above and below the correct pitch. The green lines far from the center mark the points that are 100 cents above and below the correct pitch, i.e. the previous note and the next note. The object in tuning with the spectrum display is to tune the note until the peak of the graph is centered on the red line.
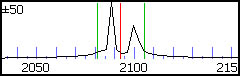
The spectrum display has several advantages over the phase display. One is that it shows where the pitch of the piano is, even when that pitch is far from the correct pitch. The other advantage is that the spectrum display can show several peaks at once. This is what you would get when playing a poorly tuned unison:
Below the display is showing frequency
of an A tuning fork slightly flat
Below the display is showing the
frequencies of a poorly tuned unison
l
The phase display is the horizontal band shown to the right. This display is used for fine tuning. The black squares move to the left if the note is flat and to the right if the note is sharp. The closer you get to the correct tuning, the slower the black squares will move. The goal is to make the black squares come as much to a stop as possible. If the piano string has any false beats then the black squares may appear to move in an irregular fashion, sometimes moving back and forth. When there is no note playing, or when the note being played is far from the correct pitch, the black squares will disappear or move randomly.
This display is called a phase display because it displays the phase of the sound from the microphone as compared to the phase of an internally generated reference pitch. The movement of the squares can be compared to listening to beats between a tuning fork and a note on the piano. For the bass and midrange, when a square makes one complete trip around the display, that corresponds to one complete beat that you would hear when comparing two tones. For higher notes the display is artificially slowed down in order to keep the speed of the display in a reasonable range.
The Tool bar:
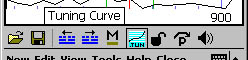
These buttons also have tool tips that appear if you touch and hold one of these buttons. For example, to the right is what appears if you touch and hold the Tuning Curve button. These tool tips remind you what the button does. If you just want to see the tool tip, but do not want the button to take its designated action, then before you lift up the stylus, drag the stylus off of the tool bar button. Otherwise, when you lift up the stylus, the button will do what it is supposed to do.
Tool tip display as Tuning Curve
Icon is touched by stylus
k
Inharmonicity:
Inharmonicity is the name given to the phenomenon whereby the partials of a piano string are not exact multiples of a fundamental frequency. TuneLab assumes that the partials are offset from their exact whole-number multiples of the fundamental by an amount that increases with the square of the partial number and is proportional to the inharmonicity constant.
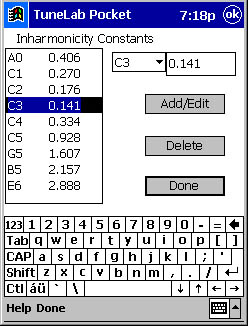
When TuneLab measures inharmonicity for a string, the pitches of all the partials of that string are analyzed and an inharmonicity constant is generated for that string. The inharmonicity constants are stored in the tuning file when a tuning is saved. You don’t need to be concerned with the actual values of the inharmonicity constants that you measure; but you can see and edit them from the Edit Menu using the screen shown to the right.
In a well-scaled piano you can expect to see the lowest inharmonicity constants somewhere in octave 2. From there the inharmonicity constants increase slightly as you move down to A0 and they increase substantially as you move up to C8, as shown in the graph to the right. TuneLab uses the specific samples that you collect to find a best-fit inharmonicity model for the entire scale. Using this model, TuneLab makes all the calculations regarding how partials relate to one another.
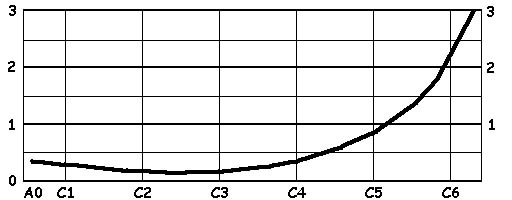
Typical Inharmonicity Values for a Kawai Grand
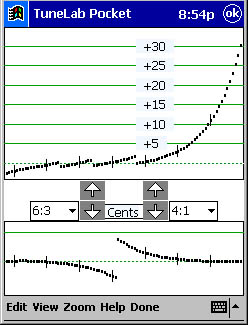
The image to the right is the tuning curve adjuster screen. The tuning curve adjuster contains two different graphs. The upper graph is called the tuning curve. The small vertical lines mark the C notes. For each note from A0 to C8 the graph shows the calculated stretch in cents. It
is this calculated stretch that appears in the current settings display under the name TCurve.
There are three adjustment modes: fully automatic, semi-automatic, and fully manual.
Normally we recommend the fully automatic mode, where the adjustment arrows are replaced by the word 'Auto', as shown to the right. Tapping on any one of them will make the fully automatic adjustment.
The display shown on the right includes just four adjusting arrows because the semi-automatic (Auto-A0-C8) option has been selected. When this option is enabled, the extreme ends of the tuning curve are adjusted automatically, leaving only the inner “shape” adjustments for you to make.
If the fully manual mode is enabled, then four more adjusting arrows would appear as shown here and you would have to adjust the endpoints of the tuning curve manually.
The lower graph is called the deviation curve. It displays information about the two intervals that are selected in the selection boxes just above the graph. As shown we have selected 6:3 octaves for the bass and 4:1 double octaves for the treble. Other intervals may be selected, depending on the kind of tuning you want to achieve.
~~~
Tuning Curve set to Auto Adjust
~~~
Tuning Curve set to Semi-Auto Adjust
~~~
Tuning Curve set to Manual Adjust
~~~
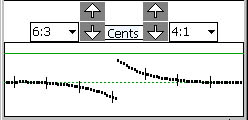
Tuning Curve Lower Graph
When TuneLab is not in any special mode, you can adjust this offset in a variety of
ways. As shown on the right, the offset may be adjusted by tapping on the phase display. The further from the center, the greater the adjustment will be. You can also enter an offset directly using the Enter Current Settings Menu item under the Edit menu.
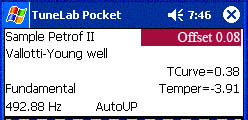
The temporary offset is not displayed if it is zero. When it is displayed, it is highlighted in red to alert you to the possibility of an unintended offset.
The temporary offset is also be activated by Locking mode, which is described below.
When Locking mode is enabled, the offset automatically and continually adjusts itself to match the pitch of the sound that the microphone hears.
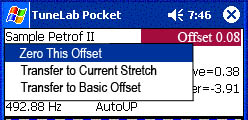
You can tap on the offset displayed in it's red box to bring up a menu with which gives you the following Options:
Zero This Offset: Which when tapped removes the Offset.
Transfer to Current Stretch: Which when tapped transfers the offset to the custom stretch for the current note.
Transfer to Basic Offset: Which when tapped transfers the offset to the basic offset (see below).
In over-pull mode, this offset is not adjustable by the user. Instead this field shows the calculated over-pull offset.
In preparation for a Tuning Exam, this field shows the detuning offset when the detuning mode is selected.
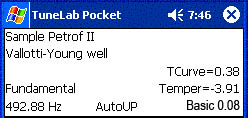
Transfer to Basic Offset
The transfered offset is used to offset the tuning as a whole. It is most commonly used to change to a non-standard pitch, such as A-442. Its effect is just like the temporary offset, except that it is not so easily changed.
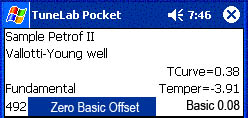
Tapping on the basic offset itself brings up a menu that allows you to zero it.
Offset Adjustment options by tapping the
Phase display where indicated
~~~~
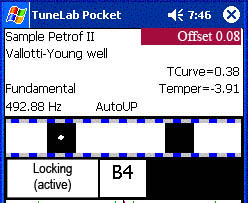
Offset set to 0.08
~~~~
Offset selection box showing the three options
~~~~
~~~~
Locking mode is very useful for tuning pianos that are below or above pitch and the customer does not want altered.
It is entered by tapping on the lock icon, as shown here.
TuneLab will now home in on the note it is hearing and set a temporary offset in the red box, upper right of the display. (see Offset Adjustment to transfer this to the Basic offset) so that the whole piano can be tuned the the desired pitch.
If you want to activate Locking mode without a sound trigger (such as when calibrating to NIST tones), you can do so by tapping the lock icon again.
To cancel locking mode, tap the current note display. When Locking mode is active, the amount of automatic offset adjustment starts out high and then gradually reduces to a minimal level after about six seconds.
You will notice that the locking action appears sluggish after the locking mode has been activated for a long time. This behavior is by design. When a note is first struck, the offset may have a long way to go to match the pitch from the microphone. But after the locking has been in operation for a few seconds, the offset is mainly hunting around some central value. If the note being sounded has some false beats, then the phase display may be a little unstable, and, if the locking continued to pursue the unstable pitch with the same aggressiveness, it would never settle down to a single value. However, when the aggressiveness of the locking action is gradually reduced, the offset will not wander as much and a more accurate reading can be taken. At any time during the locking operation the aggressiveness of the offset adjustment can be reset to its initial maximum value by tapping again on the lock icon

~~~~~~~~~~
Locking in Active
Over-pull tuning is sometimes called pitch raising. When large overall changes are made to the tuning of a piano, the notes that you tune first tend to change as you tune later notes. Over-pull tuning mode compensates for this change by setting the pitch a calculated amount beyond the desired pitch. In this way the settling that occurs as later notes are tuned, will leave the notes right where you want them. In many cases using just one pass with over-pull tuning can take the place of tuning the piano twice.
Enabling Over-pull Mode
If your pre-tuning evaluation of the piano convinces you that the overall pitch change is large enough to need an over-pull, then you can enter over-pull mode by using the over-pull icon in
the tool bar
Beginning Tuning in Over-pull Mode
Before each note is tuned in over-pull mode, TuneLab can listen to the note for one second to get a rough measurement of its pitch. TuneLab keeps this information in a history list, and uses this information to calculate the over-pull offset. You can follow your progress through the over-pull sequence by watching the status box that appears in over-pull mode. To the right is what you would see as TuneLab (1) waits for you to play the note, (2) listens for one second, and then (3) displays the results, at which time you can begin tuning the note:
How Over-pull is Calculated
You do not need to understand the exact formula for over-pull to take advantage of over-pull mode. TuneLab performs the calculation automatically based on the history list. The history list is the list of measurements taken before each note is tuned. The list is ordered from most recent to oldest. Only the most recent few measurements are displayed, but these recent measurements are the most important.
The over-pull amount is calculated by starting with the most recent few measurements in the history list. How many are actually used is determined by the number that you have selected in the box shown when you first enabled over-pull mode. By default TuneLab uses the last seven notes. Assuming that seven measurements are used, TuneLab takes a weighted average of these seven measurements using weightings that give the most weight to the most recent measurement, and progressively less weight to the older measurements. Finally TuneLab multiplies the weighted average by the over-pull percentage, and uses the opposite of that number as the over-pull in cents (subject to the safety limits, of course).
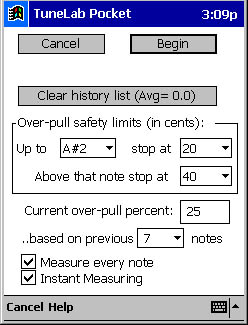
1. Over-pull in trigger mode
2. Over-pull is now measuring
3. Over-pull displaying the result
The box no the left displays
the previous results
Setting Tunelab to a nonstandard pitch:
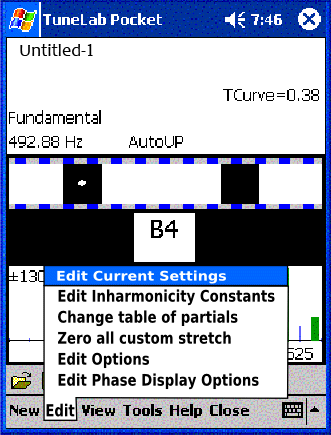
First tap Edit at the bottom of the screen. This will bring up the Edit Menu.
Then tap on Edit Current Settings (here highlighted in blue).
This will open the Current Settings Page (see below).
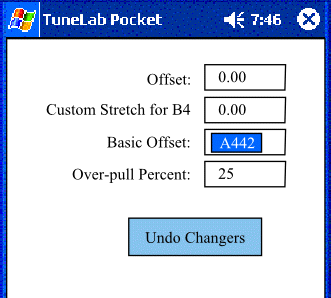
Next double tap on the Basic Offset box to change it to blue then enter the required pitch (in this instance it has been changed to A = 442 htz.
Then click Done at the bottom of the screen (not shown on example)
If you require any further information please contact Phil.
His details can be found by clicking Here.